How do I prevent lice in the classroom?
I just have to hear the word “lice” and my skin starts to crawl.
When it comes to teaching elementary school, it’s hard to not be a little freaked out at the idea of having these tiny crawlers in your classroom or, even worse, on you.
I’ve been there - one year 13 of my 26 students had it, so trust me when I say I have become a sort of self-made lice expert, haha.
This blog will walk you through strategies to prevent outbreaks in the classroom, what to do if an outbreak happens, AND what to do if you suspect you might have lice. This is going to be a FULL blog with lots of information so feel free to jump to the sections that are most helpful:
Tips for Preventing and Getting Rid of Lice for Classroom Teachers
Tip #1: What Does Lice Actually Look Like?
Before we go any further, let’s get to know these little buddies. Knowing how to spot lice will help you tremendously, not only in the classroom, but for yourself and your family.
What do they even look like? (Warning: this post WILL contain pictures of lice and eggs/nits… I apologize in advance. Knowledge is power, right?)
NITS/EGGS - Nits are lice eggs that are attached on the hair shafts close to the scalp. They can appear white, beige, yellow, or brown. Active infestations will have nits within an inch of the scalp. Farther out than that is typically dandruff or old nits.

Lice nits shown here on the shaft of hair close to the scalp, uniform size, and like sesame seeds.
Image Source: https://dermatologyknoxville.com/head-lice-need-know/
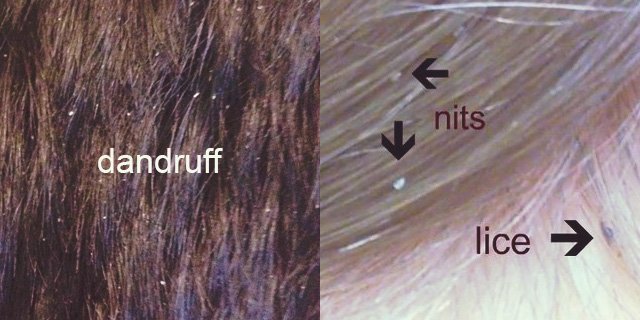
Although they can be confused with dandruff from far away, close up they more closely resemble a piece of rice. Dandruff will also be variable in size and come out with light scratching. Nits will stay in place.
LICE - Because lice are so good at hiding and moving quickly, it is pretty rare to see lice bugs early on in an infestation. The actual bugs are quite tiny, avoid light/moisture, and will blend in to the color of hair they are in. They like to live at the nape of the neck and the hair behind ears, but can be found anywhere on the scalp.
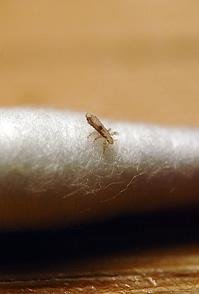
Adult lice are about the size of a sesame seed and can range in color from beige to chocolate brown.

Notice how this louse appears almost translucent as it is found in very light colored hair.
Ok, now that you are a lice expert, let’s talk about how we can prevent them from taking over your classroom…
Tip #2: Preventing Lice in the Classroom
Winter can be a popular season for the spread of lice in classroom. The cooler temps force us into close quarters and we tend to have a lot of additional outerwear. FYI, lice cannot fly, so they must move around via crawling. Due to their small size, they require close proximity of hair and/or hair adjacent materials (we are talking combs and brushes obviously, but also hats, scarves, coats, and backpacks).
COATS - Walk into any elementary class at the end of October, and you will probably see an overflowing coat closet packed to the brim. Coats can be a huge culprit for classroom outbreaks. A simple strategy a school nurse taught me is this:
Have students put coats, hats, scarves, and gloves into their backpacks before entering the classroom.
This not only prevents misplacing items, but also limits the amount of contact between kid clothing. If you are able to space your backpacks where they also aren’t touching, that can be a HUGE help as well.SEATING - While we are on the subject of proximity, also note how close your students are on the carpet and in table groups. While it’s unlikely that lice will be able to spread via crawling on the carpet, they can (and do) spread by students sitting shoulder to shoulder or standing closely in line. (Bonus: Spreading out can also help decrease the spread of ANY unwanted “bugs” or sickness outbreaks).
MATERIALS - Finally, think about shared tools that heads might touch, like: headphones, cold weather garments, and bean bags/cloth seats. After dealing with a lice outbreak, I decided I wanted all of my flexible seating to be lice unfriendly - meaning I lost the cloth chairs and opted for easily wipeable options. Another option is to have assigned materials and seating for the week. The common rule of thumb is that lice will not chill somewhere over the weekend so by Monday the spots should be safe.

Tip #3: Checking Students for Lice
Even if you become the world’s greatest lice expert, it is not your responsibility (or job) to check any student’s head for lice. This is not a good idea for a few reasons:
It could cause you to also become infected.
It can be incredibly embarrassing for students to have this done by their teacher and/or in front of classmates. (Heck, I still sometimes get a little embarrassed when I have to have a nurse check my head and I’m a grown up!)
You might miss it or unintentionally diagnose incorrectly and cause a heap of mess. No thanks, I don’t want that pressure.
You most likely don’t have all of the resources to help families know the next steps should their student be infected.
So, what do you do? (Main answer: Find out your district’s policy.)
If you notice a child frequently scratching his or her head or you think you spot nits, most districts’ want you to discreetly send that student to the school nurse who can check thoroughly and privately. Then the nurse will be able to send any pertinent information home to the family to help them get rid of the infestation.
If that student does indeed have lice, often the nurse will send the student home until the family is able to remediate the situation. If they have lice, do not panic (and do not send word home to the rest of the students’ families - this is a violation of privacy, even if the student’s name is not included). Once the students have left for the day, assess the area that student was in and address things as needed.

Tip #4: Cleaning an Infected Classroom
No matter how diligent you are, lice happens. Now what?
First, make sure your nurse, principal, specials teachers (library, art, music, PE), and custodian are aware (remember, no names). This is so they can treat other areas as necessary and/or assist you with the next steps:
Vacuum all carpeted areas, pillows, rugs, carpet squares, and upholstered furniture (such as couches, chairs, and bean bags) daily. You will want to do this for 10 days after the last identified case of head lice. Discard the vacuum bag after each day’s cleaning. Most custodians are willing to do this step for the carpets, but you may have to address other cloth materials. (Note: You do NOT need to fumigate your classroom with Lysol or anything like that because lice do not react like other pests. Vacuuming is adequate.)
This step may be dependent on your administration, but when I had a really extreme outbreak (13 of my 26 students… happy 2nd year of teaching!) we were instructed to have students put all outerwear (coats, hats, scarves, and mittens) and backpacks into garbage bags labeled with student names (I didn’t have cubbies or lockers). (Safety tip: Remember to keep unused garbage bags in areas where children will not have access.)
Really strongly enforce promixity efforts. Think about carpet time and the games they are playing at recess. Remember, your job is also to protect their emotional wellbeing so be sensitive and discreet with how you explain these precautions (read: don’t point out specifics students or even lice at all).
Put cloth items that cannot be laundered, vacuumed, or dry-cleaned in a tightly sealed container with a lid or a plastic bag for 14 days. This includes play clothing, linens, smocks, and cloth toys. (Note: some research says 48 hours is sufficient, so go with your gut here. The 14 days should allow any lice that hatch after 7 days to also die off.)
Be diligent with your own hair, sweaters, etc - particularly if you have a class that enjoys warm hugs like Olaf. If your hair is long, consider wearing it up in a bun. I also change as soon as I get home just in case I brought any new friends home on my clothes.
Have the nurse check out any suspected cases for lice (including you).
I know that was a lot, but you’ve got this. I promise it goes away eventually!

Now… the yikes step… how do you check to see if you have it and then what do you do?
Tip #5: How to Check Yourself for Lice
Checking your own head for lice can be done but can be very difficult. If possible, have a friend, partner, or parent assist you with this step. (Another option is to go to your school nurse after school - I have done this more than once and it is by far the easiest option!)
If you are checking your head (or a family member’s) at home, I have found using a metal lice comb the easiest way to check heads for lice (while also helping out with getting them OUT of your hair!)
Here are the steps:
You will need: good lighting (outside is best but a flashlight can help), METAL lice comb (plastic versions and standard combs will not work to remove the nits effectively), white paper towels, hair clips, and gloves for person inspecting hair (optional).
Wash your hair normally but do not rinse out conditioner. Towel dry some and comb thoroughly with regular comb.
Separate hair into sections. You will want to inspect a paper thin section of hair at a time starting at the nape of the neck.
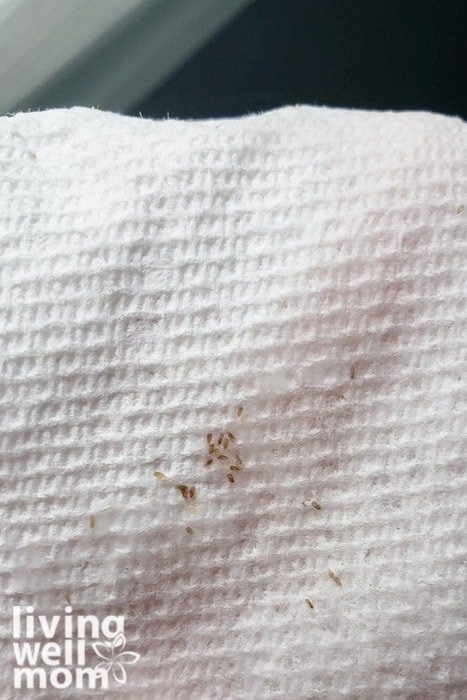
Using the lice comb parallel to the head, start at the scalp and comb down and then wipe the comb on the white paper towel. Inspect the comb and paper towel for nits and bugs (reference pictures above). Repeat this combing all four directions on the section of hair (from the top or the hair, from underneath, and from both sides) always starting at the scalp and moving down.
Make sure when you start a new section, you look for lice crawling on the scalp where the hair is parted or on the hair shaft. You are also watching for nits near hair follicle about ¼ inch from scalp. Remember, nits (eggs) will be white or yellowish-brown. Nits are often more easily seen than lice, especially when the person has dark hair.
Tip: Hot spots are behind both ears, near the back of the neck, and sometimes the crown area. You may see lice or nits. You may also see what looks like bites or a rash.
Reminder: you are wiping the comb on the white paper towel after each comb. This can be tedious but it helps you watch for nits and lice as well as prevents you from inadvertently putting bugs back into your hair. (Below are some pictures of what the lice/nits might look like on the towel. Note: they are the size of sesame seeds so very small)

If you DID NOT find evidence of lice or eggs, you can rest assured that you most likely do not have lice.
If you are UNSURE, repeat this process in a day or two.
If you DID find evidence of lice or eggs, proceed to the next section for how to handle getting rid of them.
Tip #6: How to Get Rid of Lice
Your main goal is to get rid of live lice AND the nits. I know there are some organic options out there but in my experience, people have had the most luck with a lice shampoo mixed with using a lice comb.
Always follow the directions on the box you choose, but typically you use the lice shampoo on dry hair (some have you leave it on you hair for a set amount of time), rinse, apply gobs of conditioner, and then comb using the METAL lice comb. Then, you will use the comb every day or two until you no longer find nits or bugs.

This is the kind I have used in the past and it worked well. The bonus about metal combs is once you sanitize it, you can keep it and have it on hand if you ever need to check your hair.
You will also want to address your home similarly to your classroom. Here are some areas to check:
Bedrooms/Bathrooms
Remove all linens, pillows, towels, rugs, and fuzzy items from beds and put in the dryer for 40 minutes on high heat. (If they cannot be dried, put them in a sealed garbage bag in the garage for 48 hours.)
Vacuum the mattress with a detachable hose or use a sticky lint roller
Vacuum the floor if carpeted
Clothing
Put all current dirty clothes in the dryer for 40 minutes on high heat (or seal in garage bag for 48 hours).
Brushes and Hair Materials
Replace brushes and other haircare materials if possible OR
Remove as much hair from brush and seal discarded hair in trash bag. Then soak hair brushes, combs, and accessories in hot water (135 degrees or hotter) for 10 minutes.
Cars and Car Seats
Vacuum or lint roll all seats and head rests, including car seats. (Launder cover on high heat for 40 minutes if possible.)
Living Rooms
Remove all pillows from couches and chairs and dry in the dryer for… you guessed it… 40 minutes. If items cannot go in the dryer, vacuum with the hose attachment or use the sticky lint roller.
Also vacuum/lint roll couch, rugs, and carpet.
Miscellaneous
Backpacks - Empty contents and run through the dryer for 40 minutes on high heat or put in sealed garbage bag for 48 hours.
Helmets, headphones, other headgear - Put in a sealed bag for 48 hours or if you MUST choose, often a sani-wipe is sufficient.
Sunglasses/eyeglasses - make sure to wipe down the sides with a sani-wipe.
Main takeaway: Anything the infected head has been near that is cloth or linen - vacuum, heat, or seal up.
You made it!
I mentioned earlier that I had a class with a serious outbreak. And I’ve had countless students have lice over the years, as well as helped teachers know how to get rid of it in their own homes.
But here’s my full disclosure: I know so much because I’ve had lice, too.
One summer during college I discovered I had them while showering. I still vividly remember that moment and all of the emotions it brought - disgust, embarrassment, overwhelm, confusion. I remember getting dressed and going to my mom sobbing that I couldn’t even wash the shampoo out of my hair because I was that freaked out. She sweetly washed my hair in the sink and treated it that night. It was traumatizing and more emotional than I would’ve thought lice would be.
I tell this story for two reasons.
First, you better believe my outlook on lice changed. I hadn’t realized before that moment how it might feel to be the one with lice. I didn’t realize how powerless or invaded you feel. Now when I know a student or family has been infected, I treat it discreetly and with empathy.
I also tell them I’ve had it, too.
I tell them for the same reason I’m telling YOU. If you inevitably find yourself or your child with lice at some point, I hope you won’t feel so alone. I want you to know it’s ok to be freaked out, but also that it does go away.
After my mom did a treatment, we didn’t find another live bug. She did comb nits out of my hair for a few days, but then it was over.
And NOW I know what they look like, I have a plan to prevent them, I know how to check for them, and I know how to get rid of them.
I hope you feel just a little more prepared, too.
Now, go ahead and scratch your head. I won’t judge you :)
Note: If you buy something through our links, we may earn an affiliate commission at no cost to you. Don’t worry. We only recommend things we truly like and want to share with you. Thanks so much for your support!
Other Posts You Might Like: